|
|
| (не показаны 2 промежуточные версии 2 участников) |
| Строка 1: |
Строка 1: |
| Many Scratch [[project]]s require the use of grids. A grid is an organized pattern of object placements; grids have equal spacing between each tile, which is placed onto the stage. Grids keep a project arranged mathematically. This tutorial explains how to implement a grid-placing technique into a project.
| | {{Scripting Tutorials |
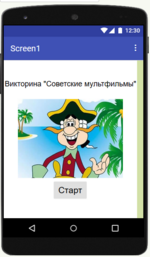
| | |Description=Создание викторины в App Inventor. |
| | : Нам понадобятся: кнопка, флажки, изображения, надписи и горизонтальное расположение. |
| | :https://gallery.appinventor.mit.edu/?galleryid=ea6dd983-2353-4112-9d55-df2c17666439 |
| | |Field_of_knowledge= Информатика |
| | |FieldActivity=Computational Thinker, Цифровой Трансформатор |
| | |Возрастная категория=5 |
| | |similar_concepts=User interface |
| | |Environment=App Inventor |
| | }} |
|
| |
|
| ==Mathematical Reasoning== | | == Интерфейс == |
| If a tile on a grid is 10 [[pixels]] wide, the spacing should be justified so each tile is 10 pixels horizontally away from the other. The same goes for any other length. The reason behind this is that tiles will not overlap. The width and height of the tiles are key in a grid script.
| |
| {{note|In a grid, each tile typically has the same resolution for arrangement and organization}}
| |
| {{note|A grid is not typically centered on the stage's center but has a corner touching it.}}
| |
|
| |
|
| ==Scripting== | | # Первый экран для пользователя-начальный <br crear=all />[[Файл:Cfif.png|150px]] <br crear=all /> |
| The following script can be implemented into the tile sprite to stamp the world, background, etc. onto the stage. For the script, assume each tile is 10 pixels wide.
| | # Второй экран-первый вопрос(Возможно вернуться в начало или перейти к следующему вопросу) <br crear=all /> |
| <scratchblocks> | | [[Файл:Экран2.png|150px]] <br crear=all /> |
| when gf clicked
| | # Третий экран-второй вопрос(Возможно вернуться к первому вопросу или завершить викторину)<br crear=all /> |
| forever
| | [[Файл:Экран3.png|150px]] <br crear=all /> |
| go to x: ((round ((mouse x) / (10))) * (10)) y: ((round ((mouse y) / (10))) * (10)) //places itself in the grid nearest the mouse-pointer
| |
| if <mouse down> then //if the mouse is clicked
| |
| wait until <not <mouse down>>
| |
| stamp //place the tile
| |
| </scratchblocks> | |
| The key aspect of the scripting is the "go to x () y ()" block. The mathematical functions inside it place the tile correctly in the grid. The way it works is it first finds how many, in this case, "10"s are from the mouse pointer to the stage's center; it does this by rounding. If there are approximately 4 "10"s in the mouse's x position, then that "4" must be multiplied by a "10" to place it corresponding to the nearest "10" interval.
| |
|
| |
|
| For example, suppose the mouse's x position is anywhere from 10-14 pixels away from the center of the [[stage]]. Whichever of those numbers is divided by 10 and rounded, it will equal "1" either way. Then, that 1 is multiplied by "10" to set the tile's x coordinate at "10". Then, as the mouse nears "15" pixels, the tile will then go to x: "20" because rounding the mouse's position divided by "10" sets the nearest 10 pixel interval location.
| | == Блоки == |
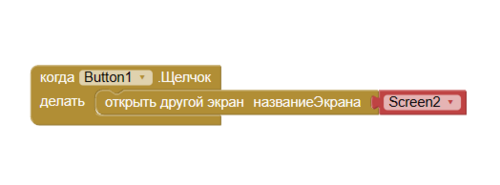
| | # На первом скрине мы делаем рабочую кнопку "Начать" <br crear=all />[[Файл:1.png|500px]] <br crear=all /> |
| | На втором и третьем добавляем вывод верного ответа и переход между скринами |
| | <br crear=all />[[Файл:2.png|500px]] |
| | <br crear=all /> [[Файл:5.png|500px]] |
|
| |
|
| ==Costume Center== | | == Результат == |
| To visually justify a tile in a grid so it fits within the imaginary grid, the costume center can be a key aspect. Assume, after reading above, the tile's width is 10 pixels. If the tile goes to the x coordinate grid of 10, even though it is technically at that coordinate, it may not visually be. If the tile's costume is at the very center, 5 pixels will be extending leftward of the "10" coordinate. In a grid, the border of the tile touches the border of the grid. For this instance, there are two solutions. The costume center can be set to either of the corners, or the script can be modified to place it correctly:
| | ; https://gallery.appinventor.mit.edu/?galleryid=ea6dd983-2353-4112-9d55-df2c17666439 |
| <scratchblocks>
| |
| when gf clicked
| |
| forever
| |
| go to x: (((round ((mouse x) / (10))) * (10)) - (5)) y: (((round ((mouse y) / (10))) * (10)) - (5)) //places itself in the grid nearest the mouse-pointer
| |
| if <mouse down> then //if the mouse is clicked
| |
| wait until <not <mouse down>>
| |
| stamp //place the tile
| |
| </scratchblocks>
| |
| This method moves the tile half of its width of pixels, placing it correctly since before it was in between a grid line.
| |
|
| |
|
|
| |
|
| ==Diamond Grid==
| | ---- |
| A diamond-based grid is far more complex to lock into than a square grid. This is because when diamonds are placed into a grid, every other column/row is shifted by half the dimension of the diamond itself. Though it can be a confusing matter, the following script can replicate placing an object into the diamond of the grid closest to the mouse. Assume that the width and height of the diamonds are 24 pixels (half being 12).
| |
| <scratchblocks>
| |
| when gf clicked
| |
| forever
| |
| if <<((round ((mouse x) / (12))) mod (2)) = [1]> and <((round ((mouse y) / (12))) mod (2)) = [1]>> then
| |
| go to x: ((round ((mouse x) / (12))) * (12)) y: ((round ((mouse y) / (12))) * (12))
| |
| else
| |
| go to x: ((round ((mouse x) / (24))) * (24)) y: ((round ((mouse y) / (24))) * (24))
| |
| end
| |
| </scratchblocks>
| |
| | |
| [[Category:Scripting Tutorials]]
| |